
AirPOS Pay FAQ
How AirPOS Pay works
AirPOS Pay offers a single transaction rate across all card types and will be charged for each successful card transaction.
There are no additional fees outside of the transaction fee that you and your sales rep have agreed on.
How to receive your bespoke AirPOS Pay rate?
Our rates are bespoke for each customer. To receive a quote, it will be helpful to have the following information prepared:
For existing businesses...
- Last three months of card processing statements
- Average card processing volume (card turnover)
- Average transaction value
For new businesses...
- Nature of your business and/or industry (what you sell)
- Estimated card processing volume (card turnover)
- Estimated average transaction value
Why do we need this information?
This is pretty standard information that most payment providers would request. However, if you are really interested in knowing why we need this information…
The short answer
So that we can give you the best possible rate.
The long answer
Most payment providers operate on an "Interchange +" pricing model. This means the payment provider will charge you the interchange fees which range from 0.2% to 2.5% depending on the card type, and then add on their margin on top.
Not us though. We do all the forecasting for you so you know exactly how much you will be paying each and every month.
The last three months of card processing statements help us determine the types of cards that are accepted through the business so we can accurately forecast the interchange fees so you don’t have to worry about them.
Registering for AirPOS Pay
To register for AirPOS Pay, you will first need to register with our partners at Stripe here.
The registration form asks for some standard business information that verifies your business to prevent fraudulent activity.
This form must be filled out by someone with significant control and management of the business. If this is not you, then make sure to ask the right person to continue.
The following outlines what business information you will require:
For individuals and sole traders...
- Type of business
- Personal details
- Industry
For companies
- Type of business
- Additional business information
- Personal details
- Business directors details
Ordering your card reader
Choose your card reader from the following options:
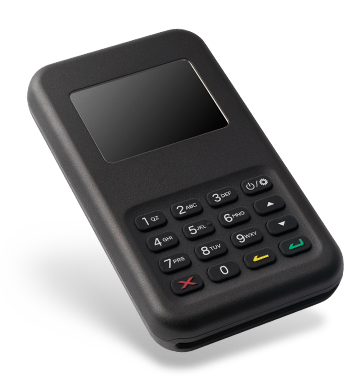
WisePad 3
The WisePad 3 is a mobile, battery-powered Bluetooth reader with a display and PIN pad. It supports insert and tap transactions as well as mobile wallets such as Apple Pay and Google Pay. The reader connects to your iOS or Android app over Bluetooth.
NB: Not available on Windows platforms.
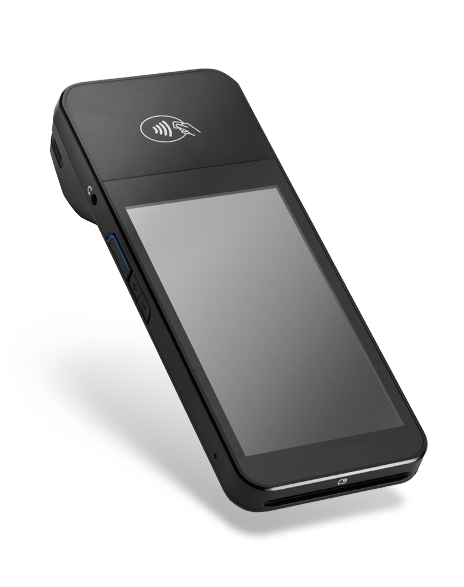
WisePOS E
The WisePOS E is an Android-based smartPOS with a 5-inch display that supports PIN on glass. Similar in size to a smartphone, the WisePOS E can be connected to your existing iOS, Android or Windows application over a local network connection via Wi-Fi.
Accepts insert and tap transactions as well as mobile wallets such as Apple Pay and Google Pay.
Before ordering your card reader, ensure that you have agreed to a rate with your sales rep and completed your registration for AirPOS Pay otherwise you will not be able to use your card reader.
Connecting your reader
Connecting your card reader is very simple.
- Ensure Bluetooth is turned on in your device settings (do not pair the card reader here)
- Ensure location services are enabled in your device settings
- Go to 'Settings' within your POS (the cog icon in the top right-hand corner)
- On the side navigation menu, click the ‘AirPOS Pay’ button
- Click ‘Set up your card reader’ and select the card reader
- When tendering a transaction, simply click the AirPOS Pay card payment option
For an in-depth guide on how to connect your card reader to the point of sale, click here.
Payment reporting and reconciliation
At the point of transaction, the fees are automatically deducted from the transaction amount. The net amount (i.e. the amount after the fees are deducted) is what will then reach your bank account (and therefore, is what will show in your Xero integration, if active).
To view your payment reports and reconciliation, visit your Express dashboard, located in your AirPOS Backoffice, or by clicking here.
Your Express dashboard will give you everything from an overview to a transaction-level report of your payment history with filters that allow you to select any given period.
You can easily visualise growth, reconcile fees, and view when your next payout is due. The Express dashboard has everything you need to know about your payments.
Payout scheduling
For you to receive funds, Stripe makes payouts to your bank account.
Previously, it took 3 business days for your funds to reach your bank account after a sale. Now, with our new T+1 timing, it'll only take 1 business day. That's a significant improvement!
Here's a quick example:
- You make a sale on a Tuesday.
- The money from that sale goes straight into your Stripe account.
- The pay-out process starts the next day, on Wednesday.
- By Wednesday, the funds are on their way to your bank account, and you'll have them in just one business day.
Please note that next day pay-outs only work on business days so you will have to consider weekends and public holidays when expecting your money.
Your payout schedule
It's simple and flexible! You can choose from various options:
- Daily Pay-Outs: Get paid every day
- Weekly Pay-Outs: Get paid every week.
- Bi-Weekly Pay-Outs: Opt for payments every two weeks.
- Monthly Pay-Outs: If monthly suits you best, that's an option too.
You can also choose to have your pay-outs delayed by a specific number of days if you wish!