
Adding Products in the AirPOS Backoffice
In the following document, we give you a quick overview of how you can add products to your new AirPOS back office. There are 2 ways to add products, one product at a time, or for those of you with large product lists, using the bulk import feature will be most useful.
If you're not already on a computer or MacBook, we highly recommend doing so now, as it's much easier when managing and adding products to your store.
Login to the Back Office here.
Adding Single Products
There are two methods for adding products to your AirPOS account for sale to your customers: either individually or via a .csv import. This section deals with adding products individually. This feature is great if you have a small list of products, or you wish to add a few new products to your back office.
If you want to add many of your products at once to AirPOS, use our Bulk Import Products feature, check out the next section below.
Adding or Editing Products one at a time.
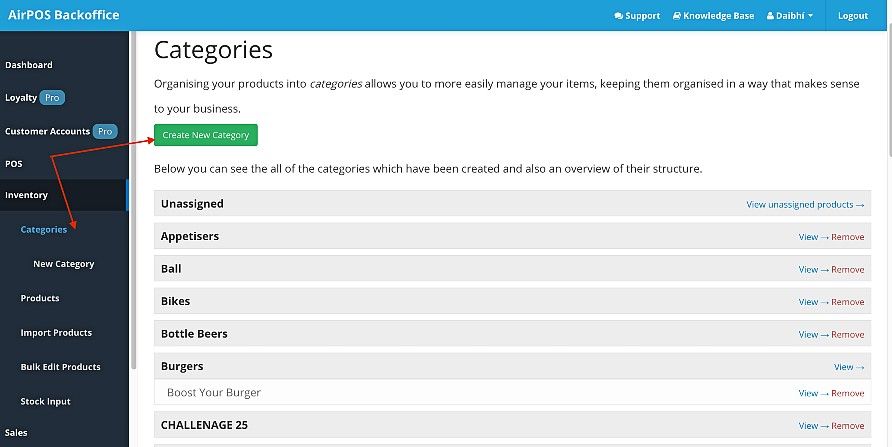
The menus used to create items are available under the 'Inventory' tab. If a category for your new product does not already exist you will need first to create one. Under 'Inventory' select 'Categories' and press the green 'Create New Category' button.
If for example you were adding a punnet of strawberries to your inventory you may need to create a new category for fruit.
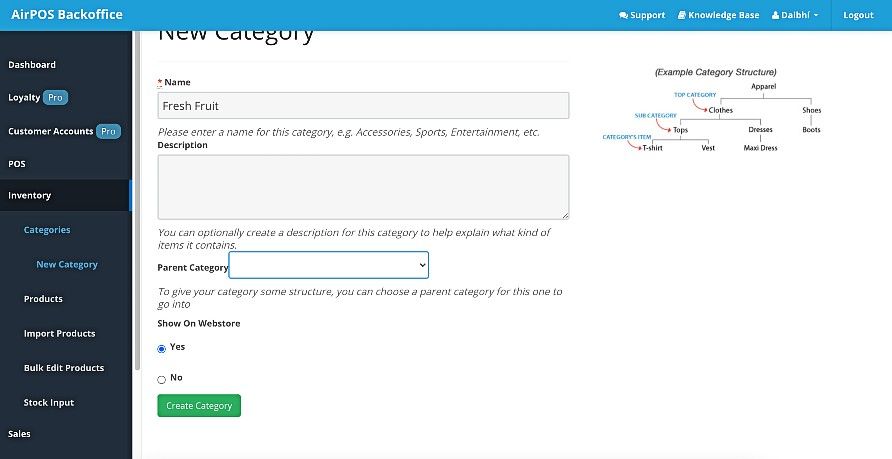
The category will be a category in it's own right so there will be no parent category. You may want your customers to be able to buy this product online and so you want the category to show on the Webstore and finally press 'Create Category. Under Categories in the left menu select 'Products' and then press the Create New Product' button at the top left.

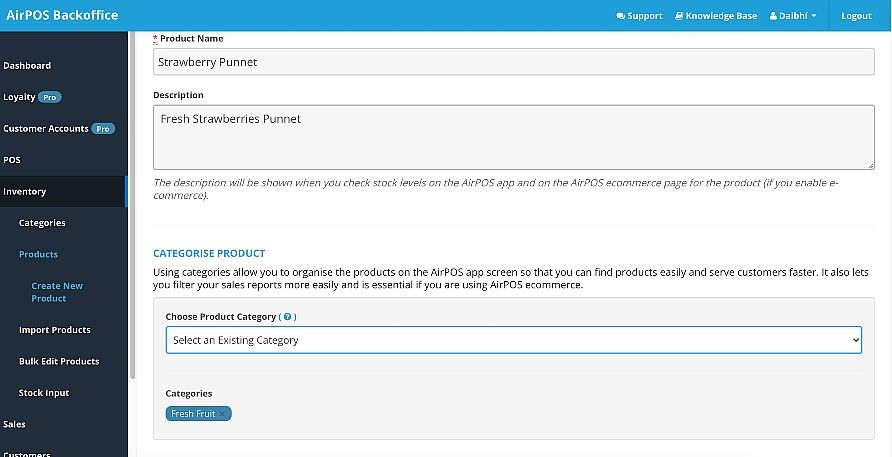
Name your product, as you are going to sell it online for collection a brief description and select a category from the dropdown list, in this case 'Fresh Fruit'. Scroll down the screen
Enter the selling and cost prices, select the tax rate from the dropdown list and upload an image for your customers ordering online. Scroll down.
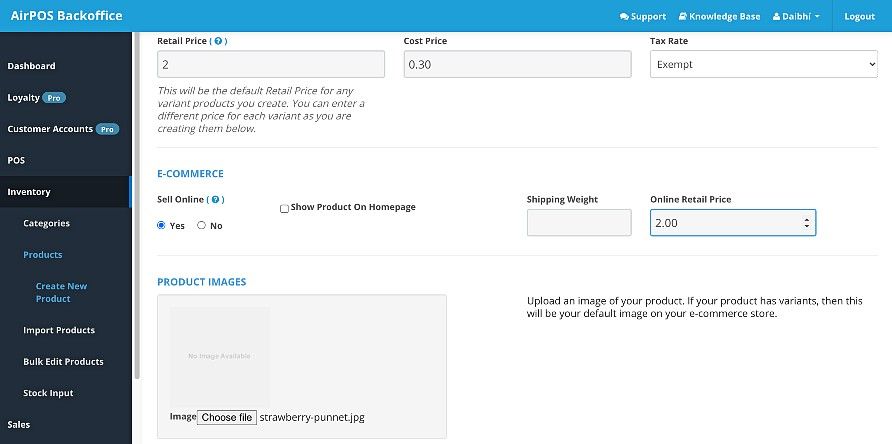
Press the create button at the bottom of the screen.

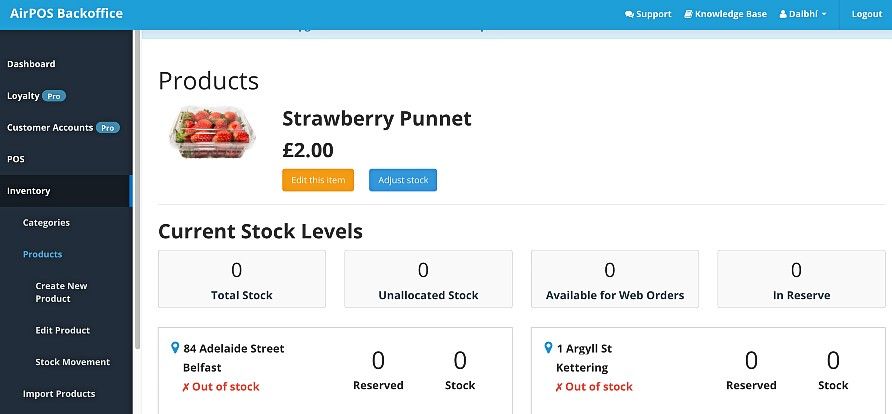
You can now view the product you have just created and add stock.
Adding Products in Bulk with a .CSV File
Watch the video above or read the article below to find out how to upload multiple products through the AirPOS backoffice.
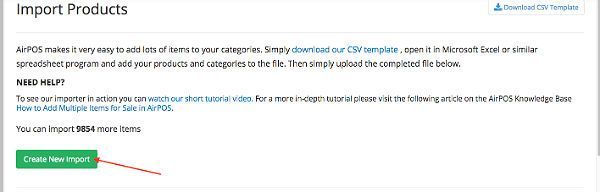
If you need to add multiple items to your inventory in AirPOS the easiest method is to Batch Import these items through a CSV file that you can create in any spreadsheet software.
To get started with batch importing, firstly download our template CSV file from the AirPOS Backoffice and open it in your spreadsheet software such as Excel or Google Sheets.
You'll see that the CSV file has a number of headings all of which relate to an attribute of your individual items. These headings are:
Item Name | Cost Price | Retail Price | Barcode | Category | Tax Rate | SKU | Sell Online | Web Price | Weight | Description | Image Filename | Stock Amount (see below).
Some of these fields MUST be filled. The product name, the retail price, tax rate and Category if left blank for any product then that product will be skipped.
If you are uploading image URLs you should copy and paste those URLs into a browser to ensure that they are valid image files and don't just take you to a Webpage, otherwise, those records will also be skipped.
If you are using Excel please take care that barcodes are not converted to scientific numbers in which case they'll be skipped or have leading zeros removed in which case they won't work. The following article will show you how to avoid that.
How to formate Barcodes in Excel
If you are using image URLs in your import file, please copy and paste them into a browser to ensure that they are valid image files otherwise any products with invalid image URLs will be skipped.

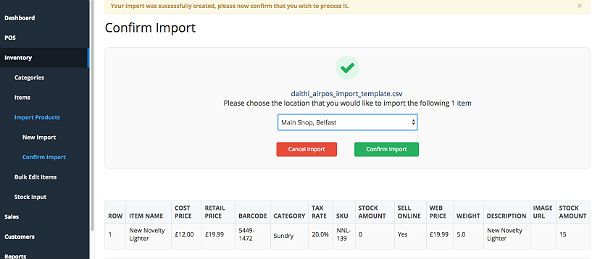
You can also upload a quantity of stock for your new item in the same upload that creates the item (highlighted in yellow in the screenshot below).

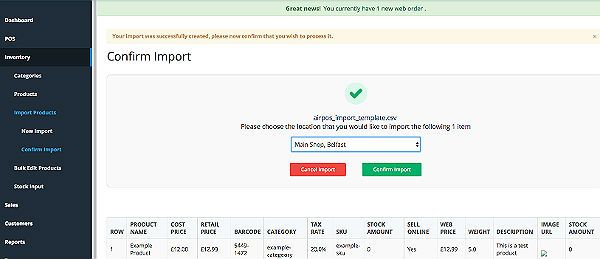
When you've uploaded your file you'll be prompted to 'Confirm' or ' Cancel' the import and you can view the import to ensure that it's correct before pressing the 'Confirm' button. There is also a dropdown list of your locations where you can choose where you want the stock quantities allocated.
If you have multiple locations you can use the importer to upload stock quantities to one of them (or all of the stock) and then transfer stock to other locations. Please see the following article for how to do that.
How to move stock over different locations
The Name, Category, tax rate and Retail prices are mandatory for the upload to work. If the other fields are left blank they will be populated by default with zero in the Cost Price and Tax Rate fields and with N (no) in the sell online field.
You can bulk upload images of your products, (which will appear on your Webstore and on the POS during an Item Lookup) by copying and pasting an image URL into the 'Description' field of the template. You can obtain a URL for your images by loading them into Photobucket, Dropbox or similar.
NOTES
- Please note: To import subcategories, simply enter it into the category field but separate it from the parent category by using the pipe symbol ( | ) e.g. Shirts | Formal Shirts. Items in more than one category can be defined by separating the categories with the caret symbol ( ^ ). e.g. Toys ^ Action Figures.
- Each of the products you have entered from your inventory will be assigned a unique identifier so that AirPOS can better manage your stock and sales reporting
- Only use the Batch Import Template to create new items of stock in your inventory. The batch importer does not overwrite existing items and will, therefore, duplicate them if used to update existing items. If you would like to edit multiple items please see here for How To Use The AirPOS Bulk Editing Tool
When you've completed your spreadsheet name it and save it as a .CSV file. This is the format that the system expects. At the bottom of the 'New Import' page, you'll see a prompt to 'Choose File'. Choose the file you've just created and press the green 'Create Import' button as seen below.

You will then be given the opportunity to view the import and any errors will be reported with a line number and the nature of the error. At this point, you can 'Confirm' or 'Cancel' the Import and if you've uploaded stock quantities decide on the location to which they'll be allocated.
Notes:
In order to be useful within the AirPOS POS application and the web store, a number of parameters are required in items.
The required fields in creating an item are denoted in the online back office with an asterisk *. All of the available fields are as follows.
- Item Name*: This will appear both in your AirPOS desktop POS client and also on your web store.
- Description: This will appear on your web store as the item description, and should be informative without being overly lengthy. The better the description of your item, the more likely you are to achieve sales on your web store so spending time getting this right is important.
- Retail Price* (including TAX): This is the full price at which you intend to sell the item. For example, if an item costs £100 and UK VAT applies to the item you would enter the item price at £120 (NOTE: the UK VAT rate at the time of writing was set at 20%)
- Cost Price: This is the price at which you purchase the item. Entering the cost price of the item is important as it informs both the profit Margin displayed on the AirPOS Desktop POS client at the point of sale as well as allowing cashiers to make an informed decision when discounting at the point of sale, again performed through the AirPOS desktop POS client.
- Tax Rate*: This is the tax rate that is to be applied to the item (e.g. UK VAT or US Sales Tax).
- Web Price: This is the price at which you intend to sell the item online. This price may differ from your retail price. For example, if an item costs £100 in-store, you may want to charge £89.99 on your webstore.
- Sell Online: This is a simple yes / no answer as to whether the item should be displayed for sale on your web store.
- Weight (kg): Item weights are used to calculate postage. Postage tables are as yet unavailable but will be available in future versions of AirPOS.
- Barcode: Barcodes are central to the successful operation of your AirPOS desktop POS client although it should be noted that they are not essential to use the software. When entering items there are two methods for adding barcodes using a Barcode Laser Scanner: We recommend the use of a barcode laser scanner for entering barcodes as the automated nature of this assists in minimising errors that may be incurred through manual entry. When setting up your scanner to work with AirPOS you will need to consult the manual for the scanner you intend to use. The scanner needs to be set to ‘Keyboard Wedge’ with a return at the end of the scan. This is normally done by scanning a specific barcode which you will find in the manual. The method for adding barcodes is simply to click into the text field beneath the barcode heading and scan the barcode into this field. Note that AirPOS pops up a warning asking if you wish to submit the item to the inventory. This is due to the operation of many barcode scanners in that they are set to automatically add a return to the end of a scanning operation for use in many POS systems. This would be the equivalent of typing a barcode and pressing return/enter, except it is simply automated for speed through the barcode laser scanner. If you are happy to submit the item as added choose OK when the warning pops up to continue.Manual Entry: It is also possible to manually enter barcodes into the AirPOS system although great care should be taken when doing so to avoid errors as errors in barcodes will have an adverse effect on the smooth operation of the AirPOS Desktop POS client. Manually entering a barcode is as simple as typing the barcode into the text field beneath the barcode heading. Again when you have completed the form and submitted the item to the inventory, AirPOS will pop up a warning as it assumes you are using a barcode scanner to enter items. Simply click OK to submit the item or cancel to continue, the item can be submitted after everything has been added.
- SKU: Stock Keeping Units (SKU) is often assigned by the individual retailer in order to track items from warehouses or in stores for example. In AirPOS case the system is designed to manage inventory and this is generally achieved through the use of barcodes. However, as vendors may wish to record an SKU for internal use or other purposes the ability to add Stock Keeping Units has been retained in the AirPOS system.
- Category*: Beneath the Add Item form will be a list of the categories and subcategories that were created in the previous step to assist you in cataloguing your new item. To select categories in which this item should appear simply tick the checkboxes next to the category you wish to add the item to or if it is a new category type the name of the new category and you will be prompted to create that new category.
- Item Images: The final step in adding an item is to choose the image that is to be attached to this item. Adding an image to an item is performed using the following method: Click on the ‘Choose File’ button. Browse to find the image on your computer. Select an image to upload. Press OK to begin uploading the images AirPOS will then begin uploading these images and you will see each image appear as they are successfully uploaded.
NOTES: if you have uploaded an image in error simply click on the thumbnail of this image to remove it from the system. In addition to this images should be resized prior to uploading if they are very large in file size, as uploading very large images will be slow and error-prone in AirPOS as it would be in any browser-based system. We also recommend that JPEGs are used as they are best for displaying on the web.
AirPOS automatically creates thumbnails of your images and resizes them to a size suitable for use on your web store. However, we recommend that images are a minimum of 500 pixels wide prior to uploading to ensure they display correctly and are not ‘upscaled’ by your web store as this will cause blockiness and blurring of the images. When you have selected the images for your item, please click Save Item at the bottom of the form to submit this item to your inventory, and if ‘Sell on Web Store’ was selected as a yes the item will also be added to your web store.